 Windows application
TetherVNC
A secure VNC server for your Windows PC that only Tether can use: it is reachable only through SSH, every sign-in needs a paired device and an account password, and one QR code sets up Tether in a single scan.
What the application does
TetherVNC lets you see and control your computer from Tether on your phone or another computer. Unlike an ordinary VNC server, it is not open to the network: the VNC port only listens on the computer itself (127.0.0.1), and Tether reaches it through an encrypted SSH tunnel. On top of that, every sign-in is checked with Tether secure sign-in: the server proves its identity first, and Tether then signs in with a device key that never leaves the device plus the account password.
A small settings app manages the server, the accounts, the paired devices and the Windows service, and creates the QR code that fills in everything in Tether and pairs the device.
Everything in one place
🖥️ Screen and input
The whole desktop, all monitors, with the mouse pointer. Only changed parts of the screen are sent (ZRLE or Raw). Mouse and keyboard work as expected; text is typed as Unicode, independent of the keyboard layout, and Ctrl+Alt+Del is supported.
📋 Clipboard and files
Copy and paste text both ways (UTF-8, up to 1 MB). Upload and download files and folders in Tether over SFTP, on the same SSH connection. Both can be turned off.
📱 QR code setup
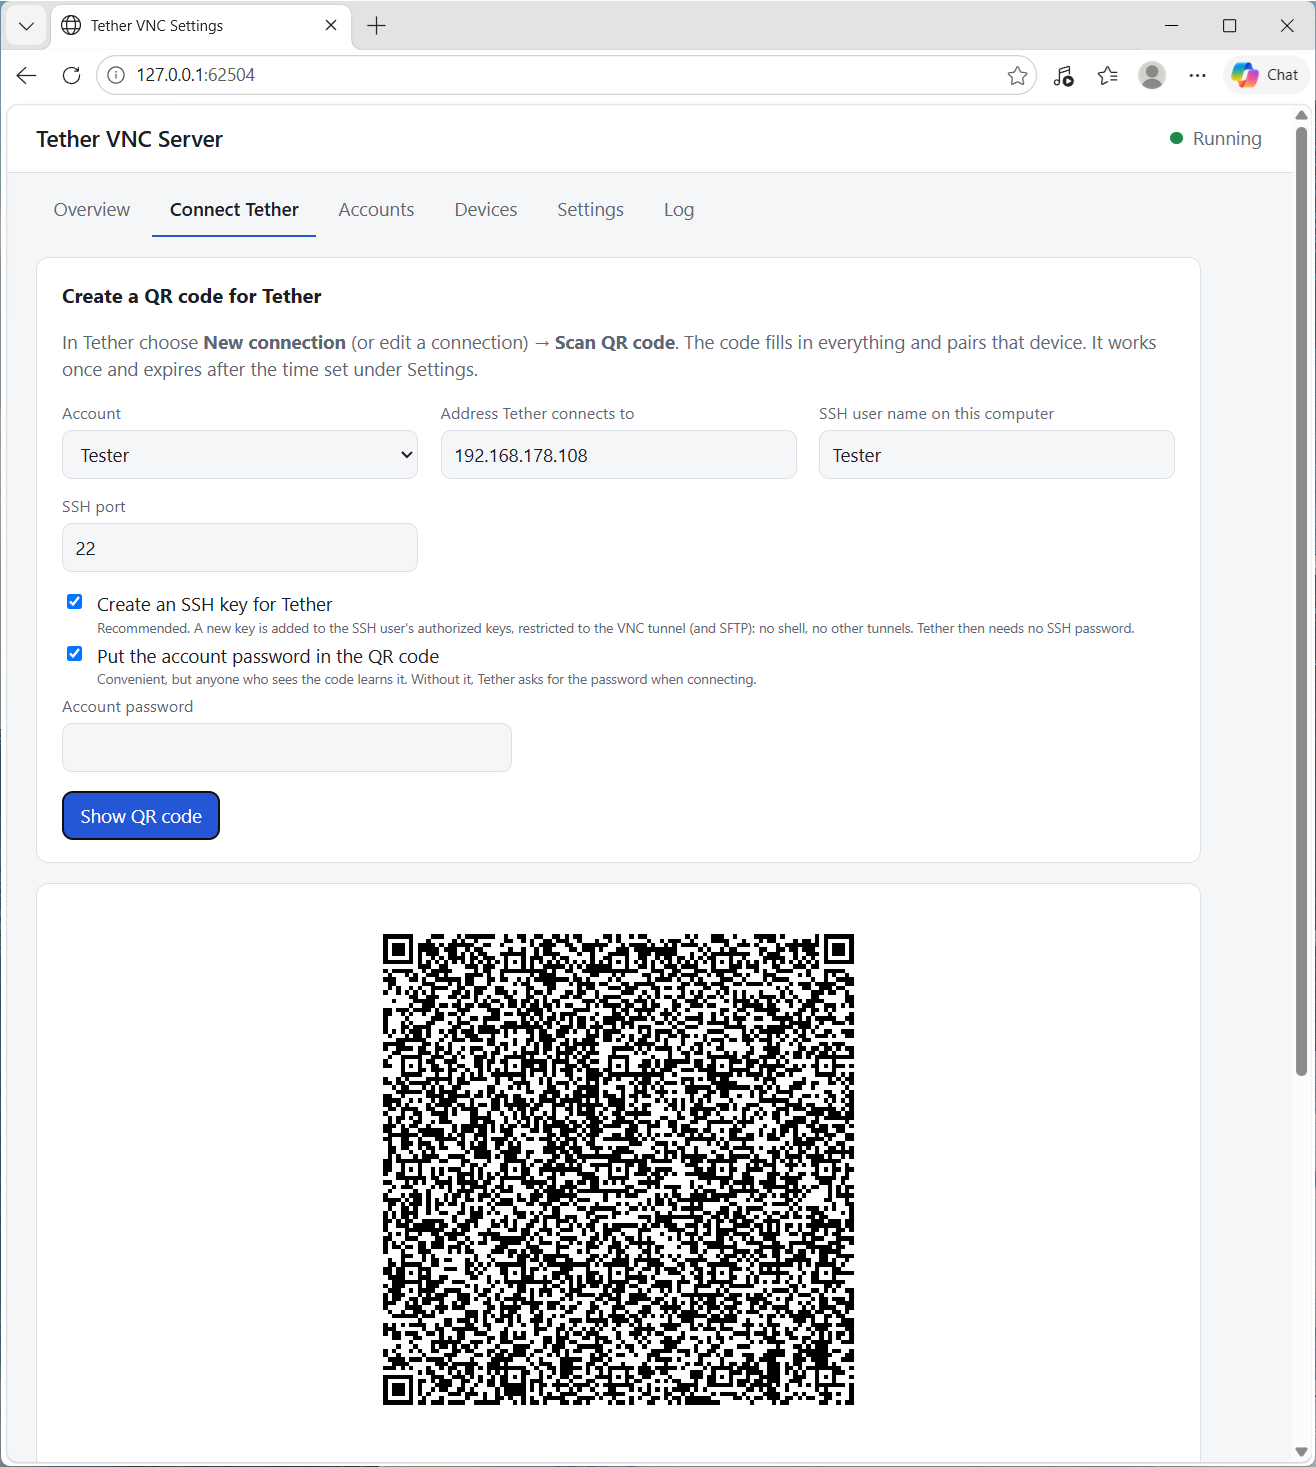
Choose an account and the address Tether uses, click Show QR code and scan it in Tether. The code fills in the connection, pins the server's keys, can create a restricted SSH key for Tether, works once and expires after 10 minutes.
🛡️ Secure by design
SSH only, pinned SSH host keys and server identity, a device key per Tether device, a password stored as a salted hash, no fallback to the old VNC password, and a lock after repeated failed sign-ins.
Highlights
- Runs as a Windows service that starts with Windows, so you can also use the sign-in screen, lock screen and UAC prompts
- A small label "Tether: <device> is connected" appears on the screen while someone is connected, so nobody watches unnoticed
- Every paired device is listed; removing a device or disabling an account disconnects it at once
- Accounts can be view only: they can watch the screen but not type or click
- The SSH key in the QR code is restricted to the VNC tunnel and SFTP: no shell, no commands, no other tunnels
- Changed settings are picked up by the running server within two seconds
- Everything is also available from the command line: tethervnc-settings status, account add, qr and more
- When the .NET runtime or a program file is missing, a launcher tells you exactly what is missing and where to get it
Download
TetherVNC is a Windows application without an installer: you download a zip file, unpack it and start the settings app from that folder. The settings app can then install the server as a Windows service.
By downloading you agree to the Privacy Statement & Disclaimer. Use is entirely at your own risk.
certutil -hashfile TetherVnc.zip SHA256. The result must match the SHA-256 value shown above.
What you need
- Windows 10 or 11 (64-bit).
- The .NET 9 Runtime and the ASP.NET Core Runtime 9 (both free, from Microsoft; the settings window needs the second one). Check with
dotnet --list-runtimes: lines starting withMicrosoft.NETCore.App 9.andMicrosoft.AspNetCore.App 9.mean you're ready. Otherwise download them for Windows x64 from dotnet.microsoft.com — the Hosting Bundle on that page contains both. You don't need the SDK. If something is missing, the settings app tells you exactly what. - The OpenSSH Server that is built into Windows (see step 1 below).
- The Tether app on the device you want to connect from.
How to install
- Unblock the zip (recommended): right-click TetherVnc.zip › Properties. If there is an Unblock checkbox at the bottom, tick it and click OK.
- Right-click the zip › Extract All… and choose a folder you control, for example C:\Users\<you>\Apps\TetherVnc. Don't start the program from inside the zip window.
- Open the extracted folder and double-click tethervnc-settings.exe. It asks for administrator rights and opens the settings window in your browser. Keep all files together in this folder.
- The first time, Windows SmartScreen may say "Windows protected your PC", because the program isn't signed by a known publisher. Click More info › Run anyway. You only need to do this once.
- On Overview, click Install as service. The program files are copied to C:\Program Files\TetherVnc and the service TetherVnc starts with Windows. Ctrl+Alt+Del from Tether is enabled for you at the same time.
To update later, replace the extracted folder's contents with the new version, start tethervnc-settings.exe from there and click Install as service again: it stops the service, copies the new files and starts it; your settings, accounts and paired devices are kept in %ProgramData%\TetherVnc. To remove it, click Remove service, then delete the folder (and that data folder if you no longer need your accounts and devices). Also click Remove Tether SSH keys on Connect Tether if you no longer use Tether with this computer.
Getting started
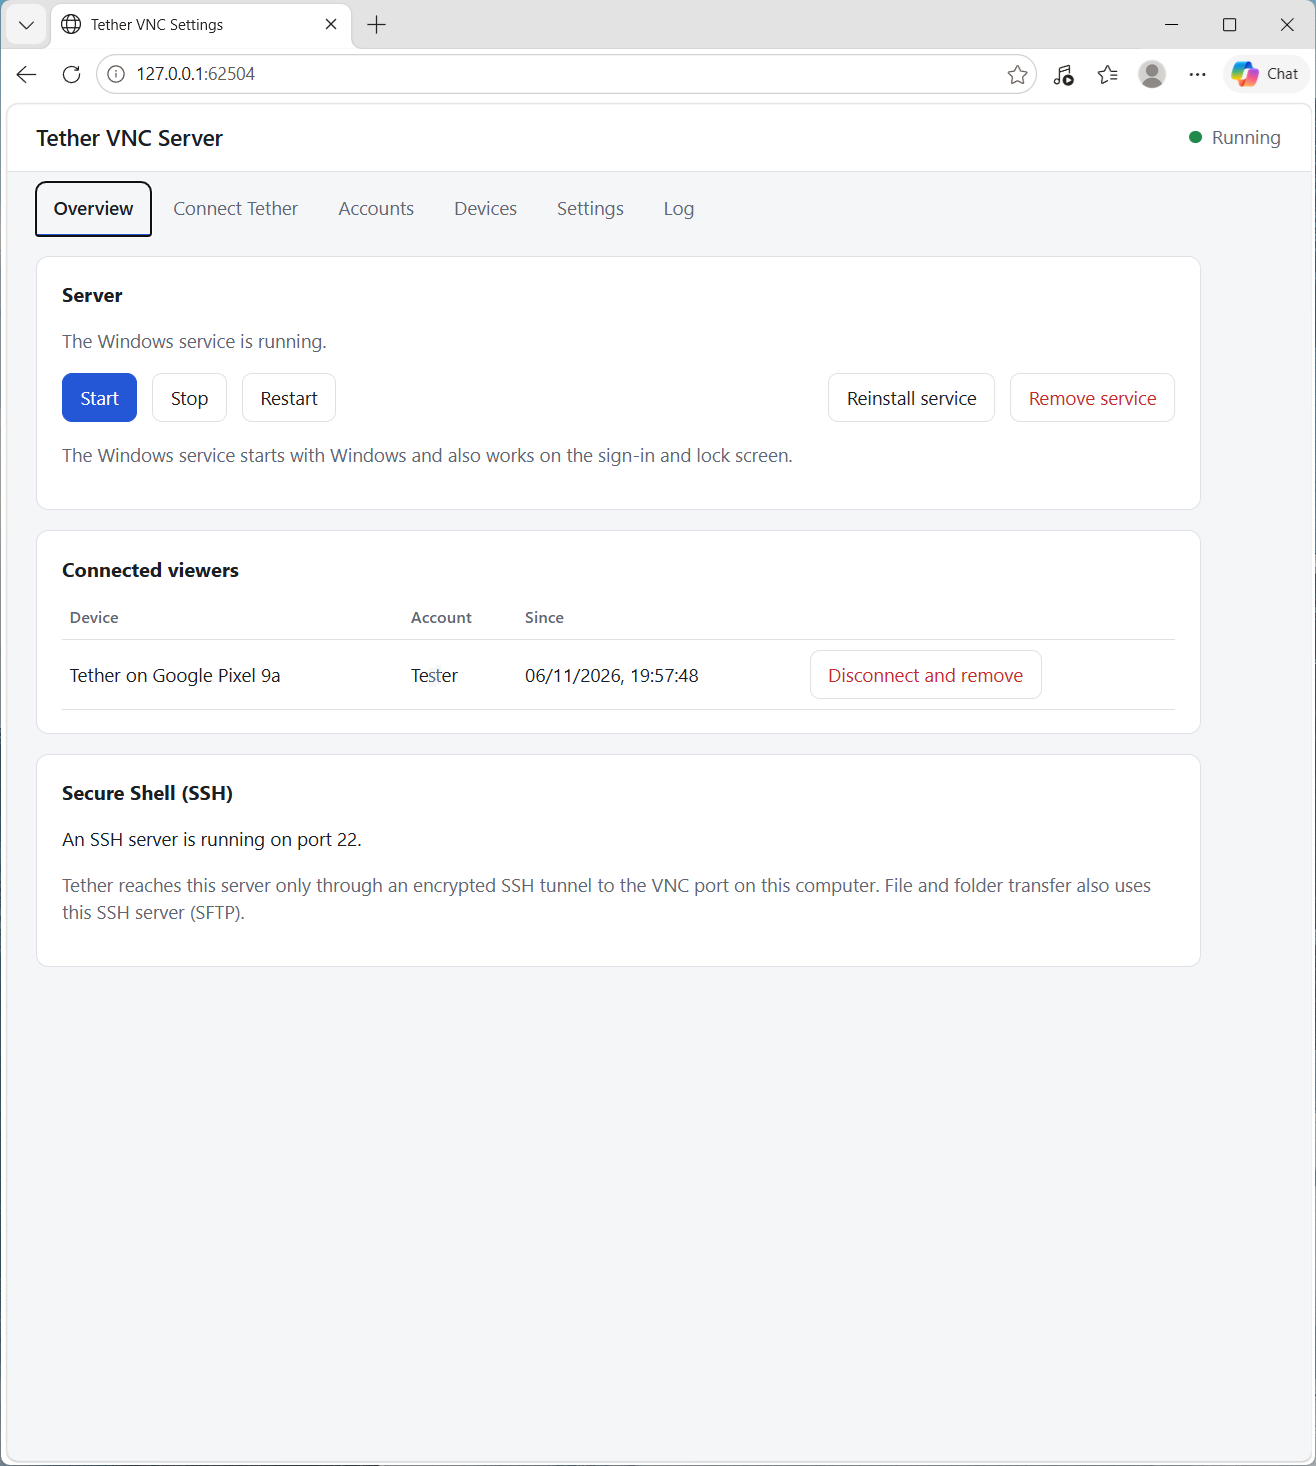
The application is in U.S. English. The settings window opens in your browser and has six tabs: Overview, Connect Tether, Accounts, Devices, Settings and Log. It is a page on your own computer only, and it closes after 30 minutes without use.
1. Turn on the SSH server
Tether connects over SSH, and file transfer uses it too. Open PowerShell as administrator and run:
Add-WindowsCapability -Online -Name OpenSSH.Server~~~~0.0.1.0
Start-Service sshd
Set-Service sshd -StartupType Automatic
The Overview tab shows whether the SSH server is running.
2. Install and start the server
On Overview, click Install as service (recommended). Without installing, Start runs the server as a normal program until you sign out. Stop, Restart and Remove service are on the same tab, together with the list of connected viewers.
3. Add an account
On Accounts, enter a name and a password of at least 10 characters (Generate password makes a strong one) and click Add account. Tick View only for an account that may watch but not type or click.
4. Connect Tether with a QR code
On Connect Tether, choose the account, the address Tether connects to (the IP address or host name of this computer), and your Windows user name for SSH. Keep Create an SSH key for Tether on, so Tether needs no SSH password. Click Show QR code.
In Tether, choose New connection (or edit a connection) › Scan QR code, save and connect. The first connection pairs the device; the QR code then stops working. The paired device appears on Devices, where you can remove it at any time.
The same from the command line:
tethervnc-settings account add jan --generate
tethervnc-settings qr jan --host 192.168.1.20 --ssh-user jan
5. Settings
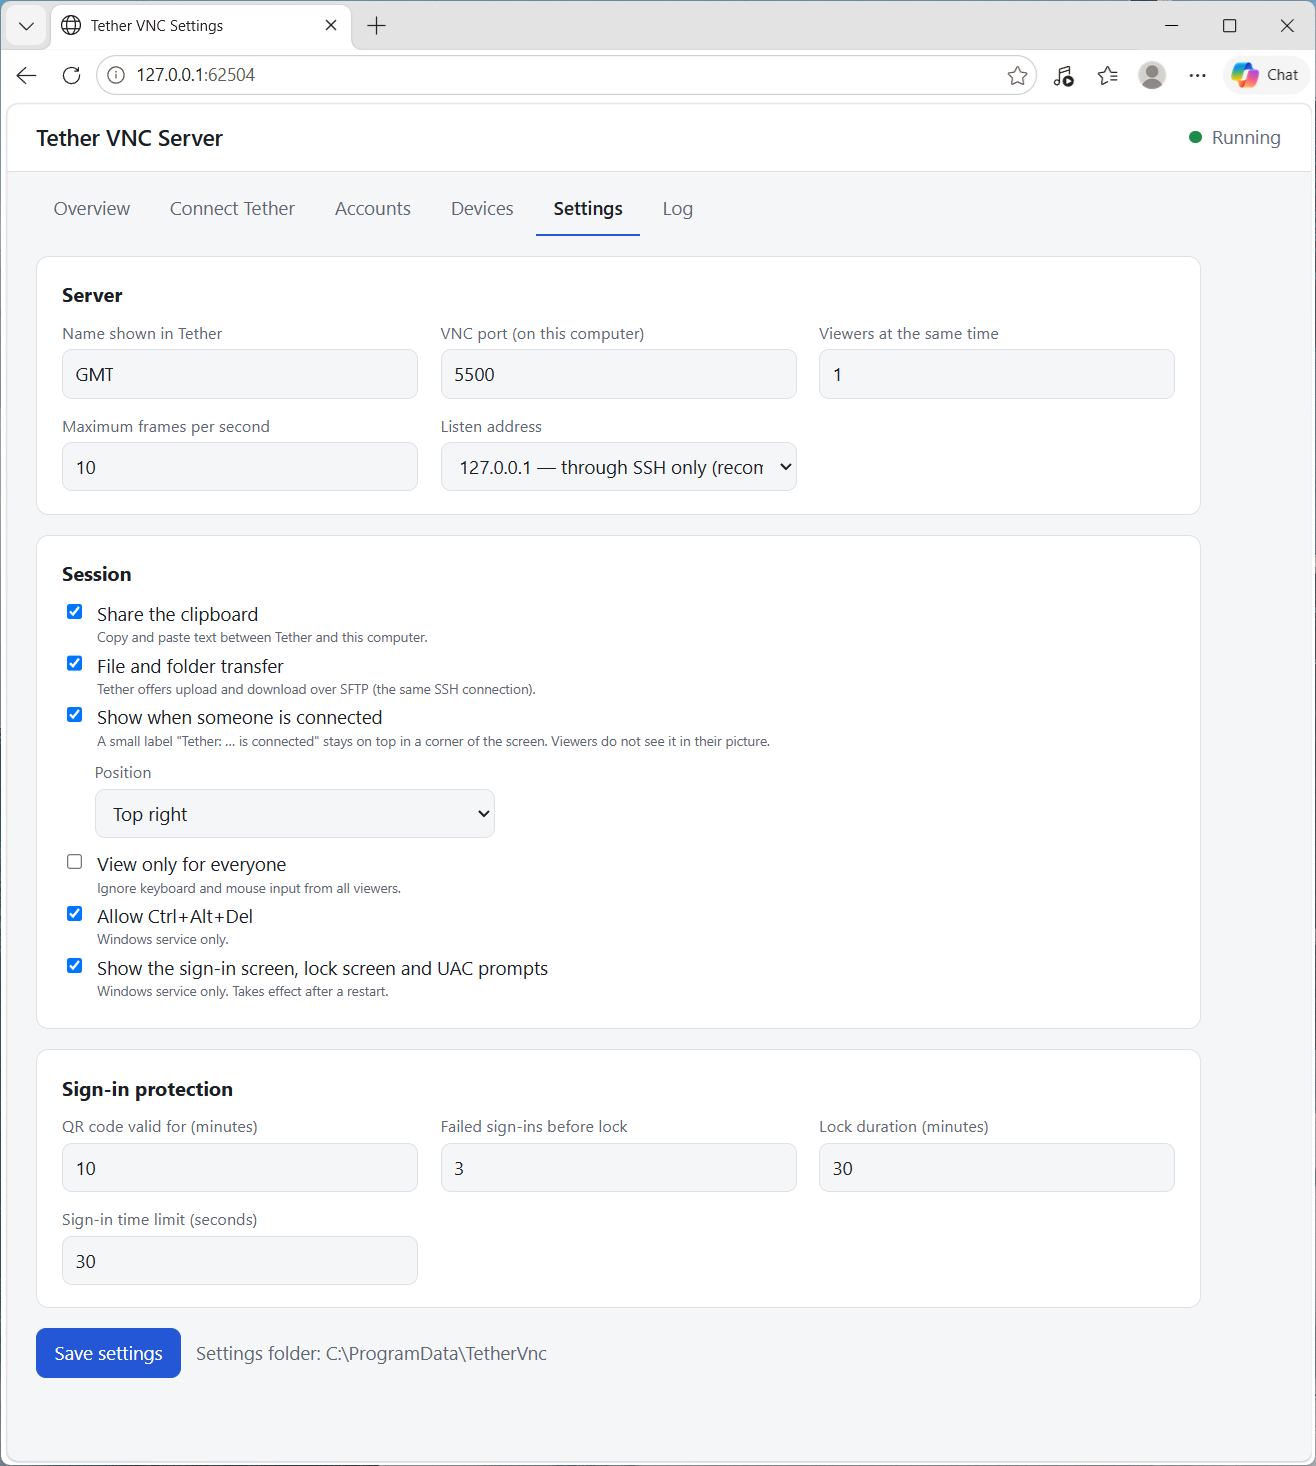
On Settings you choose the name shown in Tether, the number of viewers at the same time, the maximum frames per second, the clipboard, file transfer, the "someone is connected" label and its screen corner, view only for everyone, Ctrl+Alt+Del, the sign-in screen and UAC prompts, and the sign-in protection (QR code lifetime, failed sign-ins before lock, lock duration). Click Save settings; the running server picks them up within two seconds. The Log tab shows the server log.
- An SSH connection to this computer: the VNC port itself is not reachable from the network.
- A server that proves it holds the identity key Tether learned from the QR code — before Tether sends any secret.
- The device key of a paired Tether device. It never leaves the device, and each sign-in signs fresh data, so a recorded sign-in can't be replayed.
- The account password, sent only encrypted with a one-time key, inside the SSH tunnel. After 8 failed sign-ins in 15 minutes the account is locked for 15 minutes.
Good to know
- Where your data is stored: settings, accounts (passwords only as salted hashes), paired devices, the server's identity key and the logs are in %ProgramData%\TetherVnc, which only SYSTEM and Administrators can open.
- The QR code is a secret. It contains the pairing code, the SSH key and, if you choose, the account password. Don't photograph, print or share it; it disappears when it is used or expires. If it leaked, remove the device and the Tether SSH keys and create a new code.
- Use a separate Windows user for SSH if you can, preferably one without administrator rights: file transfer then only sees that user's files.
- Connecting from outside your home network needs a way to reach the SSH port (22) of this computer, for example a VPN. Only SSH needs to be reachable, never the VNC port.
- The program itself is cross-platform: TetherVNC also runs on Linux (X11 sessions) and macOS, with tethervnc-settings install as a user service. This download is the Windows version.
Privacy & cost — in plain terms
- Directly between your devices. Tether connects straight to your computer over SSH. There is no cloud service, relay server or account with us in between.
- No analytics, no telemetry. TetherVNC sends no crash reports, usage data or update checks; the only network traffic is your own Tether connection.
- Your data stays yours. Accounts, devices and logs are stored only on your computer. The settings window is served only to your own computer.
- No cookies, no tracking. This website sets none either.
- No payment to us, ever. The program is completely free.
For the full statement, see Privacy & Disclaimer.
Responsible use & your responsibility
TetherVNC is a hobby and educational project. Remote access gives full control over a computer, so use it only on computers that you own or are allowed to control, and never to watch someone without their knowledge — keep the "someone is connected" label on. Keep Windows and the OpenSSH server up to date, use strong passwords, remove devices you no longer use, and never share a QR code.
The application is provided "as is", for learning and experimentation, without any warranty. Please read the full Privacy Statement & Disclaimer before use — by installing or using the application you accept those terms.
Images